
How to Play Native American Flute
2 Biggest Mistakes Getting Started
In getting started learning how to play Native American Style Flute, first, we must eliminate the two biggest (but easily-avoidable!) mistakes that will make the tone crackle, jump or misbehave.

Pic: T. Gray, Public domain, Wikimedia Commons
.jpg)
Great tutorials that have tremendous technical insight often skip these #1 “unboxing” essentials without which the rest can be useless.
After the following, you can jump right into fantastic, free resources all about technique, or you may sound like a movie soundtrack today, even before anything but the following tips.
1) The adjustable, removable Block is set precisely = absolutely critical
2) Your fingers are truly, thoroughly sealing the holes (they will fool you)
Additional, supportive tips are included, as well.
How to Play Native American Style Flute
1) Block Placement
If the “Block”, “Bird” or “Totem” (same thing) is out of position at all it can leak air or misdirect air, and even tiny differences make or break performance. If you need reading glasses, you must use them here. You don’t want it sitting crooked nor slid too far forward or backward.
You should understand how it works so that this and several related issues like water droplets in the flue are intuitive for you as a non-issue:
ClintGoss, CC BY-SA 3.0, via Wikimedia Commons
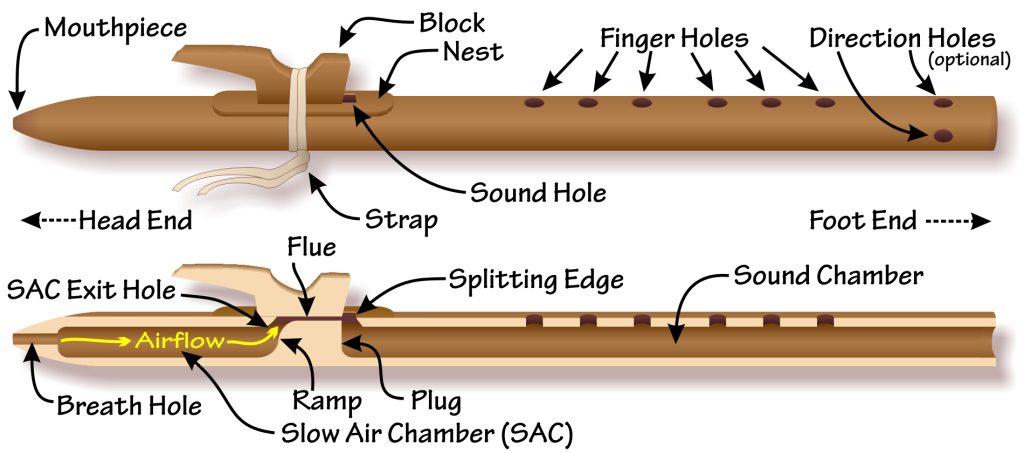
Your Block helps direct air flow through the flue, then across the top of the open Sound Hole and into the Splitting Edge.
Important: The Plug forms a little “wall” inside the flute separating the chambers and also forming the Head End side of the Sound Hole.
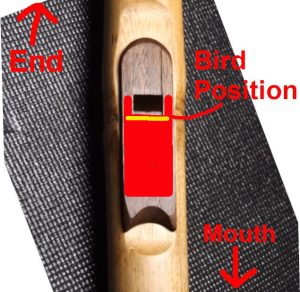
The diagram above shows the bird slid up perfectly even or flush with this wall or Head side of the Sound Hole (see Plug in the diagram and where the front of the bird is just above the plug).
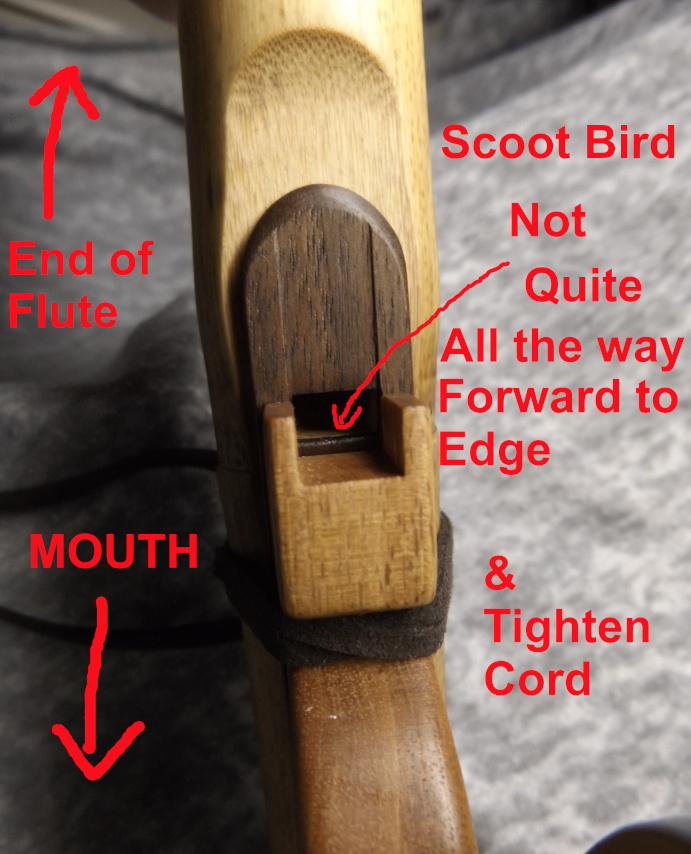
So: This is a decent starting point, many flutes put of “like” the bird here, but many flutes (like most of ours) also like the the bird slid back toward your face a millimeter or so. Here is a view looking down at an Otter Lake flute nest – as you can see the bird is slid back about a millimeter and a half or so back away from this side of the Sound Hole and the inner wall the Plug forms:
Thanks for bearing with my quick diagrams initially meant for a friend, but they work.
You can try slightly forward or backward positions by a mm here and there, but with Otter Lake flutes, unless instructed otherwise for a certain model, please begin about 1 mm to 1.5 mm back from the aforementioned edge.
Also, of course, the bird should be centered (not over to one side) and straight (not crooked).
Any debris or damage on or to the next can cause a tiny air leak that will cause malfunction.
How to Play Native American Flute:
2) Proper Finger Hole Sealing (!)
Important: Even folks in person will try to gloss past this while accidentally violating it.
That is: they have one or more fingers over holes they think (and insist) they are sealing closed properly, with the pad of their finger, but you can press their fingers down and the problem, goes away.
We’re not saying as a player you have to press really hard on the holes as a rule, but as an exercise and definitely in troubleshooting – when the flute misbehaves, press your finger pads down very hard in the center of all holes you’re trying to cover.
Maybe try looking at different angles on a mirror or have a friend look at you. I frequently see visible leaks (like black crescents!) around holes people are swearing they are covering.
Congratulations!
That covers the two biggest mistakes that kill a Day 1 experience (or flute review)!
Block misplacement after unboxing or travel, and a leaky finger hole. Seriously.
From here the sky’s the limit. We’ll include how to hole and operate:
How the Hands are Used:
Your left hand is closer to your face, your left hand covers the furthest, “South-most” or “foot-most” holes.
The hole numbers of the flute in this tutorial are labeled as makers and some teachers label them: in the order they are normally released, furthest or South-most hole is Hole #1, while the one closest to your face (usually the last hole or so uncovered) is Hole #6.
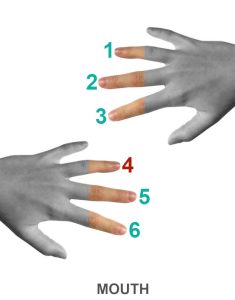
You just use your thumbs to support the flute, and pinkies are a matter of preference, one here, one there. You may let both pinkies float like using fancy teacups, or use one or more to stabilize the flute wherever you like. Jon Norris and Jeff Burris use both raised pinkies, double shot glass-style.
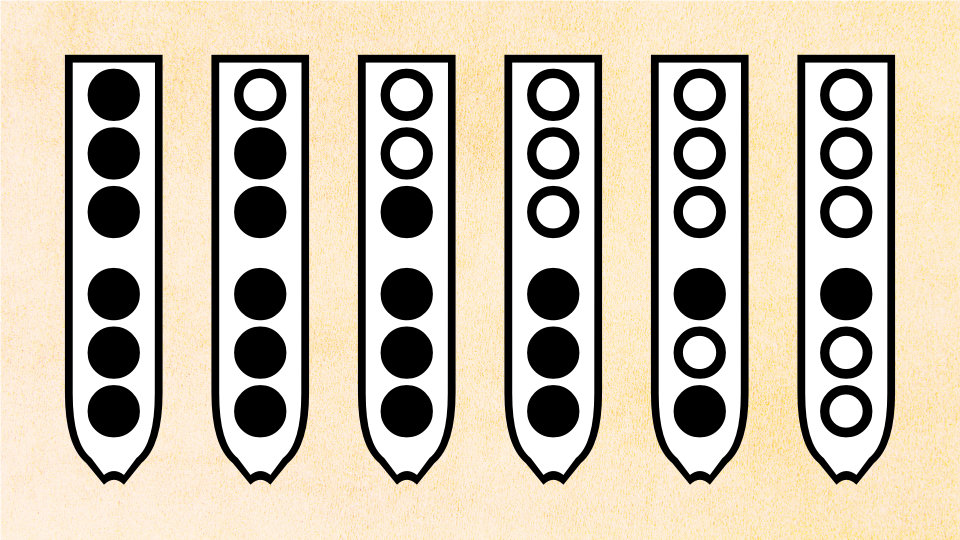
To play the standard pentatonic minor scale, here are the primary fingerings. After this, to reach extended scale notes or to play a full chromatic octave, cross-fingerings are used which is for a more advanced lesson. This gives you the 6 primary notes (pentatonic minor 5 plus the fundamental note repeated in the next octave):
ClintGoss, CC BY-SA 4.0, via Wikimedia Commons
FYI: "Wet Out"
Wet Out: this is when you play long enough for water droplets or beads to form in the Flue (see diagram for Flue) under the bird, due to breath moisture. Water beads will obstruct just enough air to create turbulence and crackling, jumping higher in tone (unintentional Overblow into a higher note) and other issues.
Fixing Wet Out: It is not necessary to remove the Block but a few times in years, often. You can simply blast the water out of the flue with a louder toot (sometimes intentionally worked into music). Others make a flinging motion but this is ill advised because it asks for an eventual accidental impact with a mic stand etc. Some have multiple flutes and let one dry after a song. Ask your flute friends how they deal with wet out. We seal and make slick the flue as much as possible so droplets eject easily. Some add beeswax, flute wax, Odie’s Oil, or Rain Guard for car windshields!
Amazing Journey
Two excellent tutors for the Native American Flute are Johnny Lipford and Clint Gloss.
Johnny has fantastic music and Clint and Vera have an incredible site at Flutopedia.com that pioneered bringing details of construction and many other subtopics to the general public in a manner so comprehensive that, before it, you really needed to spend hundreds on very limited textbooks. I can’t even get started naming quintessential native players to listen for like Mary Youngblood.
Some Standardized Terms
(standardized by various makers, not necessarily original or Indigenous names)
North = Head end of the flute (where your mouth goes)
South = Foot or furthest end from your face
TSH = True Sound Hole (sometimes just the Sound Hole)
SAC = Slow Air Chamber, the first chamber after the mouthpieces’ Blow Hole
Flue = the passageway under the Block directing the air at the TSH and Splitting Edge
Splitting Edge = South end of TSH: an upside-down wedge creating the whistle!
Nest = where the Bird (Block) sits!
Block = Bird or Totem. A removable flue ceiling often shaped decoratively or with nuances to direct air
Hyper-Octo Quantum-Squeegitude = just kidding
In Closing
Despite this being the easiest instrument we’ve ever played, some unfortunate folks have even gone as far as returning a Grade-A flute for a refund (usually where helpful, home-website tips are missing, like Amazon) complaining it’s difficult or even defective (when it’s neither, of course). This only ever happens because of something that would take two minutes to correct in person… or here!
Enjoy.
We praise God for our blessings with this craft and community.
Jeff & Tina Burris
Special Thanks also to:
Jon Norris
Clint Gloss
Edward Kort
Johnny Lipford
Hawk Henries
Bob Grealish
Native American Flute Makers Forum
Mono Loco